So, I’m currently learning to use Streamlit to visualize a data science project more easily. Then, on the documentation on the Streamlit website, there is a 30-day challenge named “30 Days of Streamlit.”
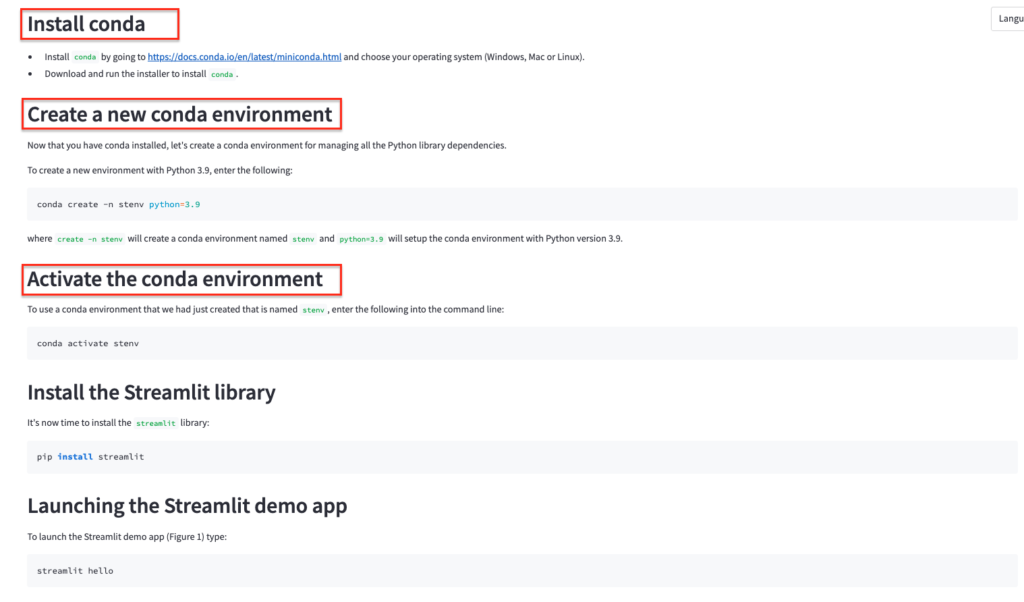
On the first day, I was asked to install Conda through Miniconda and do some setup for the environment.
There are two wordings that I haven’t fully understood, namely Conda and Environment. I’ve heard of Anaconda before, but not Conda. I’m also familiar with Environment, but I want to know more about why we need to use Conda and manage environments for a project. In this case, the context is a Python and Streamlit project.
Streamlit
Streamlit is an open-source app framework for creating and sharing data applications using Python. Streamlit allows you to build web apps for data science and machine learning projects with minimal effort.

On Day 1 page, there are three things that I haven’t fully understood why we have to do them. As for the rest, I already understand.
So, I tried to find out and got some insights that seem like they would be helpful if you experience them. Lets get started.
Understanding the Term ‘Environment’: Why Do We Need to Manage Python Environments?
Managing your Python environment is important for several reasons:
- Dependency Management:
- Different projects often require different versions of the same packages. Managing environments allows you to isolate dependencies, ensuring that updates or changes in one project do not affect another.
- For example, one project might require
pandasversion 1.2.0 while another might need version 1.1.5. Without environment management, these dependencies could conflict.
- Reproducibility:
- Environments help ensure that your code runs consistently across different systems. By managing dependencies explicitly, you can share your environment configuration with others (using tools like
requirements.txtorenvironment.yml), enabling them to recreate the exact setup you used. - This is crucial in research and production, where consistency and reproducibility of results are paramount.
- Environments help ensure that your code runs consistently across different systems. By managing dependencies explicitly, you can share your environment configuration with others (using tools like
- Isolation:
- Virtual environments isolate project-specific dependencies from the system-wide Python installation. This prevents system-wide package changes from breaking your projects.
- Isolation also means you can experiment with different versions of packages without affecting other projects.
- Security:
- Using environments can mitigate security risks by limiting the scope of installed packages and ensuring that only the necessary dependencies for a project are included.
- It also helps in quickly applying security patches to specific environments without affecting the whole system.
- Compatibility:
- Different projects might require different versions of Python itself. Environments allow you to manage multiple versions of Python on the same system.
- For instance, one project may be using Python 3.6 while another uses Python 3.8. Using environments, you can switch between these versions seamlessly.
- Ease of Collaboration:
- Sharing a consistent environment setup helps collaborators work with the same configurations and dependencies, reducing the “it works on my machine” problem.
- Tools like Conda environments and Docker containers provide a standardized way to share and deploy applications.
Tools for Managing Python Environments:
- venv:
- A built-in module in Python 3. It provides basic support for creating lightweight virtual environments.
- virtualenv:
- An external tool that offers more features than
venvand works with Python 2 and 3.
- An external tool that offers more features than
- Conda:
- A package, dependency, and environment management tool. It supports multiple languages, not just Python, and is particularly popular in data science and machine learning communities.
- Pipenv:
- Integrates
pipandvirtualenvinto a single tool for managing dependencies and virtual environments.
- Integrates
- Poetry:
- A tool for dependency management and packaging in Python. It allows you to declare the libraries your project depends on and manages (install/update) them for you.
By managing your Python environments effectively, you ensure that your development process is more organized, your projects are more reliable, and your collaborations are smoother.
So from the explanation above, we now know what the relationship between Conda and Environment is!
Does Setting Up Conda Create a Folder?
Yes, when you create a new Conda environment, Conda creates a directory for that environment. This directory contains the Python interpreter, libraries, and scripts necessary for the environment to function. Here’s a detailed look at where and how these directories are created:
Conda Environment Directory
Location:
- By default, Conda environments are created in the
envsdirectory within your Conda installation directory. For example, if Conda is installed in~/miniconda3, the environments will be located in~/miniconda3/envs/.
- By default, Conda environments are created in the
Creating a Conda Environment:
- When you create a new environment using the command:
Conda creates a directory structure forconda create --name myenv python=3.8myenvinside theenvsdirectory.
- When you create a new environment using the command:
Custom Location:
- You can also specify a custom location for your environment using the
--prefixoption. For example:conda create --prefix /path/to/myenv python=3.8
This command creates the environment in the specified path instead of the defaultenvsdirectory.
- You can also specify a custom location for your environment using the
Example of Conda Environment Directory Structure
When you create a Conda environment named myenv, the structure looks something like this (assuming the default location):
~/miniconda3/envs/myenv/
├── bin/
│   ├── activate
│   ├── python
│   └── ...
├── lib/
│   ├── python3.8/
│   └── ...
├── include/
├── share/
└── ...
bin/: Contains executables for the environment, including the Python interpreter.lib/: Contains the Python standard library and site-packages.include/: Contains C headers for Python packages.share/: May contain shared data for some packages.
How to Locate Your Conda Environments
Listing All Environments:
- You can list all Conda environments on your system using:
This command shows the names and paths of all environments.conda env list
- You can list all Conda environments on your system using:
Environment Details:
- To see the details of a specific environment, including its location, you can use:
conda info --envs
- To see the details of a specific environment, including its location, you can use:
Activating and Using the Environment
Activating the Environment:
conda activate myenvThis modifies your PATH to point to the environment’s
bindirectory, making its executables available.Deactivating the Environment:
conda deactivate
By managing environments in this way, Conda ensures that each environment is isolated, preventing conflicts between dependencies of different projects. This isolation is particularly useful for maintaining reproducibility and consistency across different development and deployment stages.
Examples: Creating 2 Python Projects Using Different Environments
Let’s assume we have two projects: project1 and project2. We’ll create environments for each project, install specific dependencies, and run some sample code.
Step-by-Step Example
Step 1: Create Conda Environments
Create Environment for Project 1:
conda create --name project1-env python=3.8Activate the environment:
conda activate project1-envInstall dependencies (for example,
numpyandpandas):conda install numpy pandasCreate Environment for Project 2:
conda create --name project2-env python=3.9Activate the environment:
conda activate project2-envInstall dependencies (for example,
scipyandmatplotlib):conda install scipy matplotlib
Step 2: Set Up Project Directories
Create directories for your projects:
mkdir project1
mkdir project2
Step 3: Write Sample Code for Each Project
Project 1 Code (
project1/main.py):import numpy as np
import pandas as pd
print("Project 1 Environment")
array = np.array([1, 2, 3, 4, 5])
df = pd.DataFrame(array, columns=['Numbers'])
print(df)Project 2 Code (
project2/main.py):import scipy
import matplotlib.pyplot as plt
import numpy as np
print("Project 2 Environment")
x = np.linspace(0, 10, 100)
y = np.sin(x)
plt.plot(x, y)
plt.title("Sine Wave")
plt.show()
Step 4: Run the Code in Each Environment
Run Project 1 Code:
- Activate the environment:
conda activate project1-env - Navigate to the project directory and run the script:
cd project1
python main.py - Output:
Project 1 Environment
   Numbers
0        1
1        2
2        3
3        4
4        5
- Activate the environment:
Run Project 2 Code:
- Activate the environment:
conda activate project2-env - Navigate to the project directory and run the script:
cd project2
python main.py - Output:
(A plot window showing a sine wave will appear.)Project 2 Environment
- Activate the environment:
Summary
- project1 uses
project1-envwith Python 3.8 and dependenciesnumpyandpandas. - project2 uses
project2-envwith Python 3.9 and dependenciesscipyandmatplotlib.
By using separate environments, you ensure that each project has its own dependencies and Python version, preventing conflicts and ensuring reproducibility.
Do we need to choose an environment before executing the project?
Yes, that’s correct. Before executing a project, you typically activate the environment associated with that project to ensure that the correct dependencies are available.
When you activate an environment, the system’s PATH variable is modified to point to the environment’s binaries and scripts. This means that when you run Python scripts or execute commands, the system uses the Python interpreter and packages installed within the activated environment.
So, before running a project, you should activate the corresponding environment. Here’s a summary of the steps:
Activate Environment:
- Navigate to the project directory.
- Activate the environment associated with that project.
- For example:
cd path/to/project1
conda activate project1-env
Execute Project:
- Run the Python script or execute commands related to the project.
- For example:
python main.py
Deactivate Environment (optional):
- After you’re finished with the project, you can deactivate the environment if you no longer need it.
- For example:
conda deactivate
By following this approach, you ensure that each project is executed within its own isolated environment, preventing conflicts and maintaining reproducibility.